Setting up
The following is the required files to start creating your Android applications for windows environment only.
1) Android SDK
http://developer.android.com/sdk/index.html
2) IDE
http://www.eclipse.org/downloads OR http://developer.android.com/sdk/index.html
3) Android plugin for Eclipse
http://developer.android.com/sdk/installing/installing-adt.html
1) Android SDK
http://developer.android.com/sdk/index.html
2) IDE
http://www.eclipse.org/downloads OR http://developer.android.com/sdk/index.html
3) Android plugin for Eclipse
http://developer.android.com/sdk/installing/installing-adt.html
1st Android application : Interval timer
Following is a simple Android app i created to get myself started on Android development. The application is an interval timer that is used for exercise purpose. User is able to input the interval and number of repetitions desired and the application will perform a count down according to user's input or default value.
As this is my first Android application, there might be bugs here and there. Do contact me with any suggestions/questions/bugs found.
Upon creating a project, there will be a lot of files created but the files we are mainly interested in are the activity_main.xml and MainActivity.java(default activity name).
Activity_main.xml
Layouts/buttons/text boxes etc are created in the form of XML. Following are excerpts of my XML:
<Button
android:id="@+id/startBN"
android:layout_width="wrap_content"
android:layout_height="wrap_content"
android:layout_above="@+id/stopBN"
android:layout_alignParentLeft="true"
android:layout_alignParentRight="true"
android:text="Start" />
<TextView
android:id="@+id/intervalView"
android:layout_width="wrap_content"
android:layout_height="wrap_content"
android:layout_alignParentLeft="true"
android:layout_alignParentTop="true"
android:layout_marginTop="79dp"
android:text="Interval (Seconds)"
android:textAppearance="?android:attr/textAppearanceMedium" />
The above creates a button and a text view. These elements contains a ID defined by:
android:id="@+id/startBN", therefore if i decided to name my button "myBN", the code will look like: android:id="@+id/myBN". There are a lot of other fields so do explore.
MainActivity.java
In this application. the MainActivity.java is where all the logic of the application is located. The objective of this application is to explore button listeners, manipulation of text views, edit text etc. We will see how they are implemented in this application.
Manipulating Data
private TextView intervalTxt;
private TextView repsValTxt;
repsValTxt = (TextView) findViewById(R.id.repValText);
intervalTxt = (TextView) findViewById(R.id.intervalText);
The 4 lines of codes above makes use of TextView to manipulate data in the text fields. Before that, we have to associate each TextView with a element in the GUI, for instance:
"repsValTxt = (TextView) findViewById(R.id.repValText);"
this line of code associates the TextView RepsValTxt with an element in the GUI with the android:id repValText
Actual manipulation of data is achieved by a number of methods after performing the above. With regards to this application, we are interested in only getting and setting data.
long interval = (Long.parseLong(intervalTxt.getText().toString())) * 1000;
repsValTxt.setText("" + repsVal);
The 2 lines of code above illustrates the getText() and setText() method.
Button Listener
A button is pretty much if we cannot allow certain activities to be carried out upon clicking on the button. To do so, we have to implement an onClickListener to detect clicking of button, and an onClick() method to perform activities.
// listener for start button
findViewById(R.id.startBN).setOnClickListener(
new View.OnClickListener() {
}
)
The 2 lines of code above implements an OnClickListener for the start button "startBN"
public void onClick(View v) {
repsValTxt.setText("" + repsVal);
}
The onClick() method allows developers to perform actions upon clicking, in this case, setting the value of repsValTxt to a value.
Conclusion
This concludes my mini tutorial for a basic Android application.
While the objective of this online journal is to keep track of my progress for my FYP, there will not be a thorough explanation of the applications or examples posted here. However, all queries or feed backs are welcomed.
The application can be downloaded below.
android camera using intent & directory manipulation
Summary
This update will focus on how to use the Android Camera API and saving the images captured in your desired folder.
An "intent" in Android is usually used to call an activity, in this case, we will be calling the camera activity. This would mean that the camera we will be using is the programmed camera and upon capturing the image, manipulate the file.
Step 1 - Setting permissions and features
In the AndroidManifest.xml we will need to include 2 permissions and 1 feature as shown below
<manifest xmlns:android="http://schemas.android.com/apk/res/android"
package="com.example.camerausingintent"
android:versionCode="1"
android:versionName="1.0" >
<uses-sdk
android:minSdkVersion="15"
android:targetSdkVersion="15" />
<uses-permission android:name="android.permission.CAMERA" />
<uses-permission android:name="android.permission.WRITE_EXTERNAL_STORAGE" />
<uses-feature android:name="android.hardware.camera" />
... ... ... ...
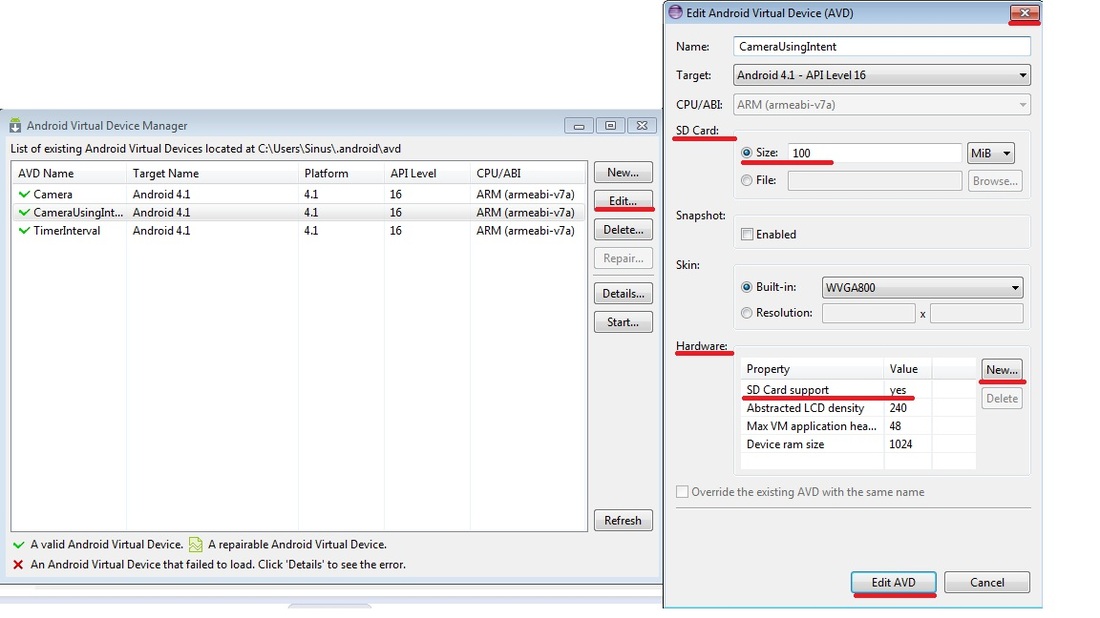
Step 2 - Setting up the Android Virtual Device(AVD)
In this example, we will be storing the image in external storage i.e. sdcard, therefore, make sure that your AVD is configured to enable sdcard support. To do this :
In eclipse, Window-> AVD Manager -> select AVD and click on Edit -> under SD Card, set the size -> under Hardware, click on New and search for SD Card support -> click on Edit AVD -> close
This update will focus on how to use the Android Camera API and saving the images captured in your desired folder.
An "intent" in Android is usually used to call an activity, in this case, we will be calling the camera activity. This would mean that the camera we will be using is the programmed camera and upon capturing the image, manipulate the file.
Step 1 - Setting permissions and features
In the AndroidManifest.xml we will need to include 2 permissions and 1 feature as shown below
<manifest xmlns:android="http://schemas.android.com/apk/res/android"
package="com.example.camerausingintent"
android:versionCode="1"
android:versionName="1.0" >
<uses-sdk
android:minSdkVersion="15"
android:targetSdkVersion="15" />
<uses-permission android:name="android.permission.CAMERA" />
<uses-permission android:name="android.permission.WRITE_EXTERNAL_STORAGE" />
<uses-feature android:name="android.hardware.camera" />
... ... ... ...
Step 2 - Setting up the Android Virtual Device(AVD)
In this example, we will be storing the image in external storage i.e. sdcard, therefore, make sure that your AVD is configured to enable sdcard support. To do this :
In eclipse, Window-> AVD Manager -> select AVD and click on Edit -> under SD Card, set the size -> under Hardware, click on New and search for SD Card support -> click on Edit AVD -> close
Click to enlarge
Step 3A - Coding (Directory)
I used 3 variables to manipulate the directory to keep the pictures as shown in except below:
//directory of photos to be kept
private File pictureDir;
//name of result image, directory + image name
private String fileName;
//result image file
private File pictureFile;
Set the directory to where you want to keep your file. Here i am saving to the SD Card, in a folder called cameraDemo (mnt\sdcard\cameraDemo):
pictureDir = new File(Environment.getExternalStorageDirectory()
.toString() + File.separator + "cameraDemo");
Set the desired name for the file. Here, it is mnt\sdcard\cameraDemo\desired_filename:
fileName = pictureDir.getPath() + File.separator + photoFile;
Finally, create a File for the file, in this case, an image:
pictureFile = new File(fileName);
Conclusion - Directory
There are many ways to achieve the above, what is shown is but a way that appears to be neat and clear to me. With this, the portion to manipulation of file directories is done and next, we will look at how to use the camera and manipulate the image captured.
Step 3B - Coding (Camera)
Create an "Intent" for camera:
Intent intent = new Intent(MediaStore.ACTION_IMAGE_CAPTURE);
Define where the URI to keep the image:
intent.putExtra(MediaStore.EXTRA_OUTPUT, outputFileUri);
Get the result of activity using startActivityForResult() which will call onActivityResult() which we will look at shortly:
startActivityForResult(intent, CAPTURE_IMAGE_ACTIVITY_REQUEST_CODE);
Based on the result of the camera activity, perform various operations desired.:
protected void onActivityResult(int requestCode, int resultCode, Intent data) {
...
...
}
If captured the image successfully, create a popup using "Toast" to display message and close the activity using finish():
if (resultCode == RESULT_OK) {
Toast.makeText(this,
"Picture saved to: " + pictureFile.toString(),
Toast.LENGTH_SHORT).show();
finish();
}
Upon completing an activity i.e.capturing an image in this example, call the activity again to allow user to capture another image:
finish();
startActivity(new Intent(CameraUsingIntent.this, this.getClass()));
Conclusion - Camera
This concludes the short example of using the camera in Android.
UPDATE CONCLUSION - ANDROID CAMERA USING INTENT & DIRECTORY MANIPULATION
This concludes the update on Android Camera using Intent & Directory Manipulation. Please feel free to send me suggestions/comments/questions regarding the update. The project can be found below.
File:CameraUsingIntent.zip
This concludes the update on Android Camera using Intent & Directory Manipulation. Please feel free to send me suggestions/comments/questions regarding the update. The project can be found below.
File:CameraUsingIntent.zip
ANdroid GPS/Google Map function
Summary
This update will focus on how to make use of the GPS functions in Android and displaying the coordinates obtained on Google Map.
Step 1 - Setting Permission on AndroidManifest.xml
This application requires 3 permissions:
1 - INTERNET
2 - ACCESS_FINE_LOCATION
3 - ACCESS_COARSE_LOCATION
... ... ...
<uses-sdk
android:minSdkVersion="8"
android:targetSdkVersion="15" />
<uses-permission android:name="android.permission.INTERNET" />
<uses-permission android:name="android.permission.ACCESS_FINE_LOCATION" />
<uses-permission android:name="android.permission.ACCESS_COARSE_LOCATION" />
... ... ...
Step 2A - Coding (GPS)
This application requires us to implement LocationListener as show below:
public class GPSActivity extends Activity implements LocationListener {
LocationManager provides access to location service and we define it this way:
... ... ...
private LocationManager locationManager;
... ... ...
locationManager = (LocationManager) getSystemService(Context.LOCATION_SERVICE);
... ... ...
Check whether user had GPS enabled:
boolean enabledGPS = locationManager
.isProviderEnabled(LocationManager.GPS_PROVIDER);
if (!enabledGPS) {
// Intent intent = new
// Intent(Settings.ACTION_LOCATION_SOURCE_SETTINGS);
// startActivity(intent);
Toast.makeText(getApplicationContext(), "Please enable GPS",
Toast.LENGTH_SHORT).show();
}
We want to be able to control the frequency of GPS updates and it is done by the requestLocationUpdates method, where the 2nd parameter controls the frequency using time, 3rd parameter controls using the minimum difference in coordinates:
locationManager.requestLocationUpdates(locationManager.GPS_PROVIDER,5000, 0, this);
The LocationListener implements 4 methods:
1 - onLocationChanged
2 - onStatusChanged
3 - onProviderEnabled
4 - onProviderDisabled
we will look at them 1 by 1.
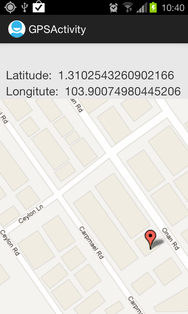
The onLocationChanged method is called when there is a change in the location:
public void onLocationChanged(Location location) {
// get the lat and lng
double lat = location.getLatitude();
double lng = location.getLongitude();
// set the textview in our form to display the lat and lng
latituteField.setText(String.valueOf(lat));
longitudeField.setText(String.valueOf(lng));
String text = "My location is: Lat = " + lat + " Lgn = " + lng;
Toast.makeText(getApplicationContext(), text, Toast.LENGTH_SHORT)
.show();
// this is the url to display the current location on google map
String url = "http://maps.google.com/staticmap?center=" + lat + ","
+ lng + "&zoom=18&size=512x512&map/&markers=" + lat
+ "," + lng;
// load the URL
position.loadUrl(url);
}
The onStatusChanged method is called when the status of service provider is changed such as from unavailable to available. In this application, we do not perform any operation in this method.
The onProviderEnabled method is called when the GPS is enabled:
public void onProviderEnabled(String provider) {
Toast.makeText(this, "Enabled new provider " + provider,
Toast.LENGTH_SHORT).show();
}
The onProviderDisabled method is called when the GPS is disabled:
public void onProviderDisabled(String provider) {
Toast.makeText(this, "Disabled provider " + provider,
Toast.LENGTH_SHORT).show();
}
Conclusion - Coding (GPS)
This is the end of the coding section for implementing GPS, next, we will look at how to display coordinates on Google Map.
Step 2B - Coding (Google Map)
To display Google Map, we need to define a "WebView" in the layout xml file in "res\layout\". In this case, it is "res\layout\activity_gps.xml"
You are free to add this space wherever you wish to, for example:
<WebView
android:id="@+id/WebView"
android:layout_width="fill_parent"
android:layout_height="fill_parent" />
In the same java file where we implement the GPS functions, we define a WebView variable:
WebView position;
Define the variable and enable java script in this view:
position = (WebView) findViewById(R.id.WebView);
position.getSettings().setJavaScriptEnabled(true);
In the onLocationChanged method explained in Step 2A, we will define the URL to call Google Map with the coordinates obtained:
public void onLocationChanged(Location location) {
... ... ...
// this is the url to display the current location on google map
String url = "http://maps.google.com/staticmap?center=" + lat + ","
+ lng + "&zoom=18&size=512x512&map/&markers=" + lat
+ "," + lng;
// load the URL
position.loadUrl(url);
}
What this does is simply craft a URL to the Google Map and feeding URL with the coordinates obtained. You may wish to play around with the values in "&zoom=18&size=512x512" to your preference.
Conclusion - Coding (Google Map)
This marks the conclusion for this section.
UPDATE CONCLUSION - ANDROID GPS/GOOGLE MAP FUNCTIONThis concludes the update on Android GPS and Google Map function. Please feel free to send me suggestions/comments/questions regarding the update. The project can be found below.
This update will focus on how to make use of the GPS functions in Android and displaying the coordinates obtained on Google Map.
Step 1 - Setting Permission on AndroidManifest.xml
This application requires 3 permissions:
1 - INTERNET
2 - ACCESS_FINE_LOCATION
3 - ACCESS_COARSE_LOCATION
... ... ...
<uses-sdk
android:minSdkVersion="8"
android:targetSdkVersion="15" />
<uses-permission android:name="android.permission.INTERNET" />
<uses-permission android:name="android.permission.ACCESS_FINE_LOCATION" />
<uses-permission android:name="android.permission.ACCESS_COARSE_LOCATION" />
... ... ...
Step 2A - Coding (GPS)
This application requires us to implement LocationListener as show below:
public class GPSActivity extends Activity implements LocationListener {
LocationManager provides access to location service and we define it this way:
... ... ...
private LocationManager locationManager;
... ... ...
locationManager = (LocationManager) getSystemService(Context.LOCATION_SERVICE);
... ... ...
Check whether user had GPS enabled:
boolean enabledGPS = locationManager
.isProviderEnabled(LocationManager.GPS_PROVIDER);
if (!enabledGPS) {
// Intent intent = new
// Intent(Settings.ACTION_LOCATION_SOURCE_SETTINGS);
// startActivity(intent);
Toast.makeText(getApplicationContext(), "Please enable GPS",
Toast.LENGTH_SHORT).show();
}
We want to be able to control the frequency of GPS updates and it is done by the requestLocationUpdates method, where the 2nd parameter controls the frequency using time, 3rd parameter controls using the minimum difference in coordinates:
locationManager.requestLocationUpdates(locationManager.GPS_PROVIDER,5000, 0, this);
The LocationListener implements 4 methods:
1 - onLocationChanged
2 - onStatusChanged
3 - onProviderEnabled
4 - onProviderDisabled
we will look at them 1 by 1.
The onLocationChanged method is called when there is a change in the location:
public void onLocationChanged(Location location) {
// get the lat and lng
double lat = location.getLatitude();
double lng = location.getLongitude();
// set the textview in our form to display the lat and lng
latituteField.setText(String.valueOf(lat));
longitudeField.setText(String.valueOf(lng));
String text = "My location is: Lat = " + lat + " Lgn = " + lng;
Toast.makeText(getApplicationContext(), text, Toast.LENGTH_SHORT)
.show();
// this is the url to display the current location on google map
String url = "http://maps.google.com/staticmap?center=" + lat + ","
+ lng + "&zoom=18&size=512x512&map/&markers=" + lat
+ "," + lng;
// load the URL
position.loadUrl(url);
}
The onStatusChanged method is called when the status of service provider is changed such as from unavailable to available. In this application, we do not perform any operation in this method.
The onProviderEnabled method is called when the GPS is enabled:
public void onProviderEnabled(String provider) {
Toast.makeText(this, "Enabled new provider " + provider,
Toast.LENGTH_SHORT).show();
}
The onProviderDisabled method is called when the GPS is disabled:
public void onProviderDisabled(String provider) {
Toast.makeText(this, "Disabled provider " + provider,
Toast.LENGTH_SHORT).show();
}
Conclusion - Coding (GPS)
This is the end of the coding section for implementing GPS, next, we will look at how to display coordinates on Google Map.
Step 2B - Coding (Google Map)
To display Google Map, we need to define a "WebView" in the layout xml file in "res\layout\". In this case, it is "res\layout\activity_gps.xml"
You are free to add this space wherever you wish to, for example:
<WebView
android:id="@+id/WebView"
android:layout_width="fill_parent"
android:layout_height="fill_parent" />
In the same java file where we implement the GPS functions, we define a WebView variable:
WebView position;
Define the variable and enable java script in this view:
position = (WebView) findViewById(R.id.WebView);
position.getSettings().setJavaScriptEnabled(true);
In the onLocationChanged method explained in Step 2A, we will define the URL to call Google Map with the coordinates obtained:
public void onLocationChanged(Location location) {
... ... ...
// this is the url to display the current location on google map
String url = "http://maps.google.com/staticmap?center=" + lat + ","
+ lng + "&zoom=18&size=512x512&map/&markers=" + lat
+ "," + lng;
// load the URL
position.loadUrl(url);
}
What this does is simply craft a URL to the Google Map and feeding URL with the coordinates obtained. You may wish to play around with the values in "&zoom=18&size=512x512" to your preference.
Conclusion - Coding (Google Map)
This marks the conclusion for this section.
UPDATE CONCLUSION - ANDROID GPS/GOOGLE MAP FUNCTIONThis concludes the update on Android GPS and Google Map function. Please feel free to send me suggestions/comments/questions regarding the update. The project can be found below.
| gpstest.zip |
Integrating of GPS and Camera + Exifinterface
Summary
In this update, the camera and GPS functions are integrated that will obtain data from the GPS and as the user takes a photo, the GPS coordinates are saved into the photo's EXIF interface.
I will illustrate in this update on how to:
In this update, the camera and GPS functions are integrated that will obtain data from the GPS and as the user takes a photo, the GPS coordinates are saved into the photo's EXIF interface.
I will illustrate in this update on how to:
- save information into the EXIF interface of an image, particularly the GPS coordinates.
- convert the GPS coordinates from degree to DMS format
- how to trigger a media scanner to allow images to be read by phone on photo taken
Step 1 - Converting GPS coordinate in decimal degree to DMS format
When we obtain the GPS coordinates via location.getLatitude(); coordinates in decimal degree i.e. 1.300975578 is returned. However, if we want to save the GPS coordinates into the EXIF interface of an image, it has to be in the degree, minute, second (DMS) format. Below shows how to convert the latitude:
//get the decimal portion of coord
double deciNum = coordLat % 1;
//get the whole number part
int wholeNum = (int) coordLat;
// process latitude to dms
//define latDegree
latDegree = String.valueOf(wholeNum);
//for minute, we want the decimal portion of coord * 60
coordLat = deciNum * 60;
//get the decimal portion
deciNum = coordLat % 1;
//get the whole number part
wholeNum = (int) coordLat;
//define latMin
latMin = String.valueOf(wholeNum);
//for seconds, we want the decimal portion of the minutes *60
coordLat = deciNum * 60;
//get the whole number portion of it
wholeNum = (int) coordLat;
//define latSec
latSec = String.valueOf(wholeNum);
// end lat deci to dms
To learn more on GPS coordinates, http://en.wikipedia.org/wiki/Geographic_coordinate_conversion
Step 2 - Saving and Retrieving EXIF Data
When looking at the details of an image in the phone, information such as data, location, latitude and longitude is seen, these information are called the EXIF attributes. The excerpt of my code on how to access and get/set the attributes is as follow:
try {
// instantiate exifinterface
exifInterface = new ExifInterface(pictureFile.toString());
// set the attributes for lat long
exifInterface.setAttribute(ExifInterface.TAG_GPS_LATITUDE, fLat);
//save the attributes
exifInterface.saveAttributes();
// this shows how to retrive info from exif
Log.d("EXIF DATA","lat: "+ exifInterface.getAttribute(ExifInterface.TAG_GPS_LONGITUDE));
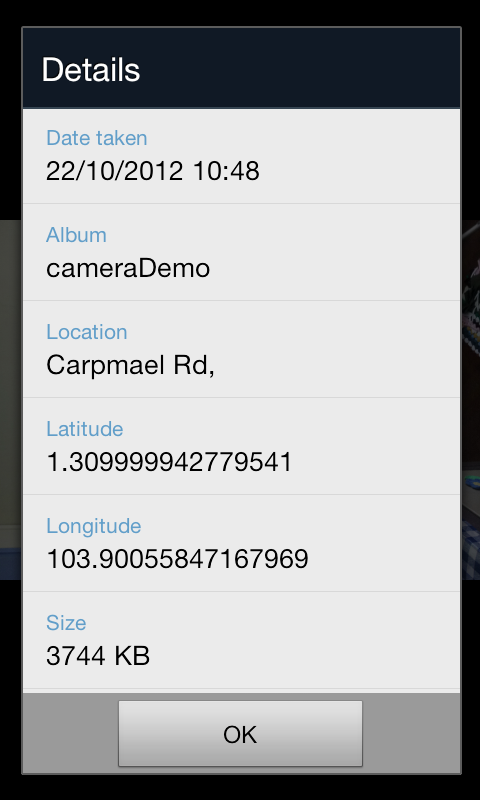
EXIF interface of image with GPS coord
Step 3 - Saving Image and Triggering Media Scanner
In the previous example "cameraUsingIntent", upon taking a photo and saving to your phone, you will be able to see it in the gallery nor see it's detail, this is because the image file has not been scanned by the media scanner. One would have to perform actions such as moving the image file to somewhere or restart the phone or activities that triggers media scanner to see the file in the gallery. In this update, i will be showing how to trigger a media scanner.
Implements the MediaScannerConnectionClient which implements 2 methods, onMediaScannerConnected() and onScanCompleted() which we will look at later:
public class GPSCam extends Activity implements LocationListener,
MediaScannerConnectionClient
Define a MediaScannerConnection variable
MediaScannerConnection msc;
Instantiate the variable
msc = new MediaScannerConnection(this.getApplicationContext(), this);
Establish connection
msc.connect();
Scan the file. in the case, the Image file we captured
if (msc.isConnected()) {
msc.scanFile(this.pictureFile.toString(), null);
}
This method is called when MediaScanner is coonected
public void onMediaScannerConnected() {
Log.d("scanner connected", "scanner connected");
}
This method is called when MediaScanner has finished scanning
public void onScanCompleted(String path, Uri uri) {
Log.d("scanned comeplete", " scan complete");
}
UPDATE CONCLUSION - INTEGRATING OF GPS AND CAMERA + EXIFINTERFACE
This marks the end of this update, in the source code provided below probably still contains some bugs and requires further fine tuning. Please feel free to send me suggestions/comments/questions regarding the update. The project can be found below.
File: IntegratedCamGPS.zip
This marks the end of this update, in the source code provided below probably still contains some bugs and requires further fine tuning. Please feel free to send me suggestions/comments/questions regarding the update. The project can be found below.
File: IntegratedCamGPS.zip
Validating Gps signal and getting distance between 2 Locations
Summary
The contents in this update is a continuation from the previous one with new features such as checking whether there are any GPS signal obtained as well as getting the distance between 2 locations.
The contents in this update is a continuation from the previous one with new features such as checking whether there are any GPS signal obtained as well as getting the distance between 2 locations.
Step 1 - GPS Signal Validation
Enabling GPS does not guarantee that latitude and longitude is obtained (i.e in underground, indoor). This application requires the photo taken to be stored at different places depending on whether GPS coordinates is obtainable and hence the need to check for the validity of GPS signal.
First of all, the class have to implement GpsStatus.Listener to constantly check for states (started, obtained or ended):
public class GPSCam extends Activity implements LocationListener,
MediaScannerConnectionClient, GpsStatus.Listener
Next, implementing the GpsStatus.Listener requires you to implement the onStatusChanged() method which listens to events - 1) started, 2) received first fix (obtained coordinates), 3) stopped, 4) satellite status. In this application we will only be looking at events 1, 2, and 3. A variable GPSValid is used to track the validity of the status where 0 is valid and 1 is invalid:
public void onGpsStatusChanged(int event) {
switch (event) {
case GpsStatus.GPS_EVENT_STARTED:
// Started
break;
case GpsStatus.GPS_EVENT_FIRST_FIX:
// First Fix
GPSValid = 0;
Toast.makeText(getApplicationContext(),
"Check GPS Valid listener ff: " + GPSValid,
Toast.LENGTH_SHORT).show();
Log.d("Check GPS Valid listener: ff", "awdwa: " + GPSValid);
break;
case GpsStatus.GPS_EVENT_STOPPED:
// Stopped
GPSValid = 1;
Toast.makeText(getApplicationContext(),
"Check GPS Valid listener: stop" + GPSValid,
Toast.LENGTH_SHORT).show();
Log.d("Check GPS Valid listener: stop", "awdwa: " + GPSValid);
break;
}
}
Step 2 - Obtain Distance between 2 Locations
In this application, a user is able to "remember" a location and photos taken within a radius will be be kept under the same folder. In this update, we will not be focusing on how to persist the information, therefore, the source is hard coded for demonstration purpose but the destination is obtained from the location where the photo is taken:
protected float calculateGPSDistance() {
//create the source location
Location source = new Location("source");
//set the lat and lng of the source, now hard coded
source.setLatitude(this.testLat);
source.setLongitude(this.testLng);
//create the destination location
Location dest = new Location("dest");
dest.setLatitude(this.lat);
dest.setLongitude(this.lng);
Log.d("dist values", "slat: " + source.getLatitude() + " slng: "
+ source.getLongitude() + " dlat: " + dest.getLatitude()
+ " dlng: " + dest.getLongitude());
//obtain the distance from souce to destination in meters and return the value
return source.distanceTo(dest);
}
Step 3 - Keeping Photos in Various Directories Based on Validity of GPS Signal
In this update, the file system is as shown:
In this update, the file system is as shown:
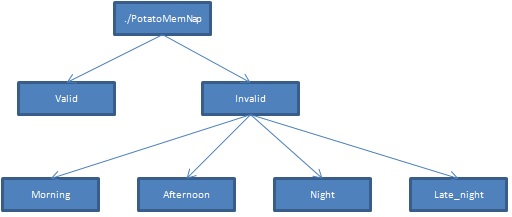
File System
If GPS is invalid, the photo is saved in to ./PotatoMemNap/Invalid/X where X is either morning, afternoon, night or late night depending on the time the photo is taken. Shown below is an excerpt of the setUpImageFile() method which generates the path of the photos:
protected File setUpImageFile() {
// establish mediascanner connection
msc = new MediaScannerConnection(this.getApplicationContext(), this);
msc.connect();
fileName = "";
// determine the directory of the image depending on whether GPS signal
// available and time of the day
if (GPSValid == 0) {
pictureDir = new File(Environment.getExternalStorageDirectory().toString() + File.separator + "PotatoMemNap" +
File.separator + "GPSValid");
} else if (GPSValid == 1) {
//Create Time object
Time now = new Time();
//get the current time
now.setToNow();
//get the hour of the current time
int hourNow = now.hour;
if (hourNow >= 6 && hourNow <= 11) {
// morning
pictureDir = new File(Environment.getExternalStorageDirectory().toString() + File.separator + "PotatoMemNap" +
File.separator + "GPSInvalid" + File.separator + "Morning");
Last but not least, we want to use the distance between 2 locations to perform something. In this update, we will just print something out as demonstration:
if (GPSValid == 0) {
// if GPS is valid, calculate the distance from source to
// dest to bound a radius
if (this.calculateGPSDistance() < 10) {
Toast.makeText(this, "at home", Toast.LENGTH_SHORT).show();
Log.d("distance", "at home");
} else {
Toast.makeText(this, "NOT at home", Toast.LENGTH_SHORT).show();
Log.d("distance", "NOT at home");
}
UPDATE CONCLUSION - VALIDATING GPS SIGNAL AND GETTING DISTANCE BETWEEN 2 Locations
This marks the end of this update, in the source code provided below probably still contains some bugs and requires further fine tuning. In the next update, we will be looking at how to persist data and enhance the file system. Please feel free to send me suggestions/comments/questions regarding the update. The project can be found below.
This marks the end of this update, in the source code provided below probably still contains some bugs and requires further fine tuning. In the next update, we will be looking at how to persist data and enhance the file system. Please feel free to send me suggestions/comments/questions regarding the update. The project can be found below.
| integratedcamgps_2.zip |
structural change & data persisting with android sqlite
Summary
There is a structural change in this update to make the application more object oriented. Apart from that, this update is focusing on how to to persist data using the Android SQLite.
There is a structural change in this update to make the application more object oriented. Apart from that, this update is focusing on how to to persist data using the Android SQLite.
Step 1 - Structural Change
As a matter of fact, this change only involves creating another java class that treats each image captured as a object, allowing easier access and manipulating of information. Please download the file at the end of this update for details.
As a matter of fact, this change only involves creating another java class that treats each image captured as a object, allowing easier access and manipulating of information. Please download the file at the end of this update for details.
Step 2.1 - Persisting Data: Creating Database Handler Class
Firstly, a database handler class is created which extends SQLiteOpenHelper and you have to implement the onCreate() and onUpgrade() methods:
public class DBObject extends SQLiteOpenHelper {
For the onCreate() method which is called when an DB object is created:
public void onCreate(SQLiteDatabase db) {
// create the table
String CREATE_IMAGEINFO_TABLE = "CREATE TABLE " + TABLE_IMAGEINFO + "("
+ KEY_ID + " INTEGER PRIMARY KEY," + KEY_PATH + " TEXT,"
+ KEY_LAT + " TEXT," + KEY_LNG + " TEXT," + KEY_DESCRIPTION
+ " TEXT" + ")";
db.execSQL(CREATE_IMAGEINFO_TABLE);
}
For the OnUpgrade() method which is called when an DB structure is changed such as dropping and adding tables/columns:
public void onUpgrade(SQLiteDatabase db, int oldVersion, int newVersion) {
// Drop older table if existed
db.execSQL("DROP TABLE IF EXISTS " + TABLE_IMAGEINFO);
// Create tables again
onCreate(db);
}
Following are methods that aid in inserting, retrieving, updating and deleting of rows. We shall first look at inserting of row which is pretty straightforward:
// add new image
public void addImage(ImageObject io) {
// open DB for reading and writting
SQLiteDatabase db = this.getWritableDatabase();
// informations to be inserted: path,lat,lng,desc
ContentValues values = new ContentValues();
values.put(KEY_PATH, io.getPath().getPath());
values.put(KEY_LAT, io.getLat());
values.put(KEY_LNG, io.getLng());
values.put(KEY_DESCRIPTION, io.getDescription());
// insert
db.insert(TABLE_IMAGEINFO, null, values);
db.close(); // Closing database connection
}
Next, a method on retrieving a row:
// retrieve single image
public ImageObject getImageInfo(String path) {
SQLiteDatabase db = this.getReadableDatabase();
// db.query: 1st para = table name, 2nd param = info to retrive, 3rd
// param = "where" clause in sql which "?" is replaced by the 4th param,
// followed by groupby, orderby, having and limit
Cursor cursor = db.query(TABLE_IMAGEINFO, new String[] { KEY_PATH,
KEY_LAT, KEY_LNG, KEY_DESCRIPTION }, KEY_PATH + "=?",
new String[] { String.valueOf(path) }, null, null, null, null);
//if there are >=1 records, go to the 1st record
if (cursor != null)
cursor.moveToFirst();
File imageFilePath = new File(cursor.getString(0));
//retrive the info and return as an image object
ImageObject io = new ImageObject(imageFilePath, cursor.getDouble(1),
cursor.getDouble(2), cursor.getString(3));
return io;
}
Next, a method on retrieving all the rows in a table, note previously db.query() which is a structured query method provided by the SQLite library is used, in this following method, a db.rawQuery() which uses SQL statement is used:
//retrieve all image info
public List<ImageObject> getAllContacts() {
List<ImageObject> imageList = new ArrayList<ImageObject>();
//sql query to select a everything from table
String selectQuery = "SELECT * FROM " + TABLE_IMAGEINFO;
SQLiteDatabase db = this.getWritableDatabase();
//rawquery takes in sql statement unlike query which has a structured manner
Cursor cursor = db.rawQuery(selectQuery, null);
//loop through all rows and adding to list
if (cursor.moveToFirst()) {
do {
ImageObject io = new ImageObject();
File imageFilePath = new File(cursor.getString(1));
io.setPath(imageFilePath);
io.setLat(cursor.getDouble(2));
io.setLng(cursor.getDouble(3));
io.setDescription(cursor.getString(4));
//add item to list
imageList.add(io);
} while (cursor.moveToNext());
}
return imageList;
}
Last but not least, an update method, note that a delete function can be done in a similiar fashion by calling db.delete() instead of db.update():
//update
public int updateContact(ImageObject io) {
SQLiteDatabase db = this.getWritableDatabase();
//columns that is to be updated, here, only desc
ContentValues values = new ContentValues();
values.put(KEY_DESCRIPTION, io.getDescription());
//update row
return db.update(TABLE_IMAGEINFO, values, KEY_PATH + " = ?",
new String[] { String.valueOf(io.getPath()) });
}
Step 2.2 - Persisting Data: Using the DB Handler Class
Firstly, create a DBObject in the GPSCam class:
... ...
DBObject dbo;
public void onCreate(Bundle savedInstanceState) {
super.onCreate(savedInstanceState);
setContentView(R.layout.activity_gpscam);
dbo = new DBObject(this);
... ...
... ...
}
Next, to perform inserting, counting and retrieving rows:
Log.d("inserting", "insertig path = " + this.io.getPath());
dbo.addImage(new ImageObject(this.io.getPath(), this.io
.getLat(), this.io.getLng(), this.io.getDescription()));
Log.d("done inserting", "done insertig");
Log.d("image count", "count = " + dbo.getImageCount());
Log.d("retriving", "retriving paht = "
+ this.io.getPath().getPath());
ImageObject dbImage = dbo.getImageInfo(this.io.getPath()
.getPath());
Log.d("db info",
"path = " + dbImage.getPath().getPath() + " lat = "
+ dbImage.getLat() + " lng = "
+ dbImage.getLng() + " desc = "
+ dbImage.getDescription());
UPDATE CONCLUSION - STRUCTURAL CHANGE & DATA PERSISTING WITH ANDROID SQLITE
This marks the end of this update, in the source code provided below probably still contains some bugs and requires further fine tuning. In this update, i notice some difficulties while trying to create the options menu button in the GPScam class, more research have to be done and should there be a problem with programming the options menu button in the current program, there might be a need to program the camera in another way. In the mean time, please feel free to send me suggestions/comments/questions regarding the update. The project can be found below.
This marks the end of this update, in the source code provided below probably still contains some bugs and requires further fine tuning. In this update, i notice some difficulties while trying to create the options menu button in the GPScam class, more research have to be done and should there be a problem with programming the options menu button in the current program, there might be a need to program the camera in another way. In the mean time, please feel free to send me suggestions/comments/questions regarding the update. The project can be found below.
| integratedcamgps_database_oo.zip |
camera/video/gallery/menu option
SUMMARY
This is a rather major update. As mentioned in previous update, the camera function has been reprogrammed for greater flexibility and hence, is not longer using the Android MediaStore image capture intent. Instead, the Camera class is used. Apart from that, video taking capabilities is introduced and a gallery is created to view the photos in the folders. Last but not least, the menu option has been coded for each of the activities.
Due to the amount of changes and addition to the code for this update, i will not be able to explain each of the changes in detail and will only attempt to explain the more important portions in my opinion.
Step 1.0 - Camera Class
When we are not using the Android MediaStore capture image intent, there are 2 major components to create a usable camera function. First, the camera preview, which is the screen that you see before you click on the image capturing button. Secondly, handling the camera class itself.
Step 1.1 - Media Preview (MediaPreview.java)
I named it media preview because this preview class is used by the video taking function as well.
A preview needs a surface to "draw" what the camera is seeing. The MediaPreview class extends the SurfaceView class and implements SurfaceHolder.Callback. It basically performs the tasks of getting the surface holder and tells the camera where to "draw" the preview, and what to do when the surface's status change. Below is the constructor:
public MediaPreview(Context context, Camera camera) {
super(context);
mCamera = camera;
// get the holder
mHolder = getHolder();
// implement callback to get notified of surfacechanges
mHolder.addCallback(this);
}
When the surface is created, let the camera know the surface to "draw" on:
// this method is called when surface is created
public void surfaceCreated(SurfaceHolder holder) {
try {
// set the surface to play the preview
mCamera.setPreviewDisplay(holder);
mCamera.startPreview();
} catch (IOException e) {
Log.d("CameraView",
"Error setting camera preview: " + e.getMessage());
}
}
Step 1.2 - Camera Activity (CameraActivity.java)
This is the place where we handle what to do upon taking images.
There are 3 important portions in this class. Firstly, getting the back facing camera and setting it's orientation. Secondly, adding the surface. Thirdly, capturing the moment upon clicking the button to capture image.
Below is a snippet of the code for getting the camera and setting the orientation:
// create new back face camera
cam = Camera.open();
// set the orientation
cam.setDisplayOrientation(90);
Below is a snippet of the code for adding the SurfaceView for the preview:
frameLayout = (FrameLayout) findViewById(R.id.preview);
// If the camera was received, create the app
if (cam != null) {
// Create a new camera view and add it to the layout
mediaPreview = new MediaPreview(this, cam);
frameLayout.addView(mediaPreview);
}
Below is a snippet of the code for capturing the moment upon clicking the button to capture image in 3 phase, shutterCallBack, rawCallBack and jpegCallBack.
// listener for capture image button
findViewById(R.id.capImageBtn).setOnClickListener(
new View.OnClickListener() {
// actions to perform
public void onClick(View v) {
mediaPreview.mCamera.takePicture(shutterCallback,
rawCallback, jpegCallback);
}
});
While there are 3 phases, we are only interested in the jpegCallback:
/** Handles data for jpeg picture */
PictureCallback jpegCallback = new PictureCallback() {
public void onPictureTaken(byte[] data, Camera camera) {
...
...
};
Step 2.1 - Video Activity (VideoActivity.java)
As mentioned before, the video function requires setting up the preview and getting the camera, so please refer to previous step.
To be begin, we need to add the following permission to the AndroidManifest.xml:
<uses-permission android:name="android.permission.RECORD_AUDIO" />
<uses-permission android:name="android.permission.RECORD_VIDEO" />
Apart from that, the video function uses the MediaRecorder class and is pretty straight forward.
Below is the snippet to prepare the MediaRecorder:
// this method is called to initialise the requried preparations
private void initMediaRecorder() {
...
...
try {
// release the camera for mediaRecorder to use
cam.unlock();
// note that changing the order of the following might cause the
// video recording to not work
mediaRecorder.setCamera(cam);
mediaRecorder.setAudioSource(MediaRecorder.AudioSource.DEFAULT);
mediaRecorder.setVideoSource(MediaRecorder.VideoSource.DEFAULT);
CamcorderProfile camcorderProfile_HQ = CamcorderProfile
.get(CamcorderProfile.QUALITY_HIGH);
mediaRecorder.setProfile(camcorderProfile_HQ);
mediaRecorder.setOutputFile(vidFile.getAbsolutePath());
mediaRecorder.setMaxDuration(60000); // Set max duration 60 sec.
mediaRecorder.setMaxFileSize(5000000); // Set max file size 5M
mediaRecorder.setPreviewDisplay(mediaPreview.getmHolder()
.getSurface());
mediaRecorder.prepare();
} catch (IllegalStateException e) {
// TODO Auto-generated catch block
e.printStackTrace();
} catch (IOException e) {
// TODO Auto-generated catch block
e.printStackTrace();
}
}
After clicking the button to start recording the video, we just need the follow 2 lines:
initMediaRecorder();
mediaRecorder.start();
Step 3.1 - Gallery Activity (GalleryActivity.java)
There are a few tricky parts to the gallery. Firstly, since we have both image and videos, we have to create a gallery that adds a ImageView to display image, or VideoView to display video, dynamically depending on the media type.
To begin, the gallery is created using a HorizontalScrollView in the layout XML(you can create through code also):
<HorizontalScrollView>
...
...
</HorizontalScrollView>
Next, we select the folder that we want to target:
myGallery = (LinearLayout) findViewById(R.id.mygallery);
String targetPath = Environment.getExternalStorageDirectory()
.getAbsolutePath() + "/PotatoMemNap/GPSValid/";
File targetDirector = new File(targetPath);
File[] files = targetDirector.listFiles();
if (targetDirector.exists() && files.length > 0) {
for (File file : files) {
myGallery.addView(insertMedia(file.getAbsolutePath()));
}
}
Next, we add the image/video in 1 by 1. The logic here is to create a linear layout and an image/videoview to the gallery, at the same time, adding a onTouch listener to each of the image/videoview so when an image/videoview is touched, the bigger image/videoview is set to one being touched:
public View insertMedia(final String path) {
...
// dynamically create selected video/image view
final RelativeLayout rl = (RelativeLayout) findViewById(R.id.relativeLayout1);
final RelativeLayout.LayoutParams rlParams = new RelativeLayout.LayoutParams(
LayoutParams.MATCH_PARENT, LayoutParams.MATCH_PARENT);
rlParams.addRule(RelativeLayout.ABOVE, R.id.horizontalScrollView1);
rlParams.addRule(RelativeLayout.ALIGN_PARENT_TOP);
rlParams.addRule(RelativeLayout.ALIGN_PARENT_LEFT);
LinearLayout layout = new LinearLayout(getApplicationContext());
layout.setLayoutParams(new LayoutParams(120, 120));
layout.setGravity(Gravity.CENTER);
if (mediaType.equalsIgnoreCase("jpg")) {
// set the initial selected image/videoview to first item
if (displayedFirstItem == false) {
// this.displayingSelectedImage = true;
rl.addView(selectedImageView, rlParams);
Bitmap myBitmap = BitmapFactory.decodeFile(path);
selectedImageView.setImageBitmap(myBitmap);
mediaHandler = dbHandler.getMediaInfo(path);
displayedFirstItem = true;
}
// imageview on horizontalscrollview
ImageView imageView = new ImageView(getApplicationContext());
imageView.setLayoutParams(new LayoutParams(100, 100));
imageView.setScaleType(ImageView.ScaleType.CENTER_CROP);
imageView.setImageBitmap(bm);
// listener for the each of the imageview on the
// horizontalscrollview
imageView.setOnTouchListener(new View.OnTouchListener() {
public boolean onTouch(View v, MotionEvent event) {
rl.removeView(selectedVideoView);
rl.removeView(selectedImageView);
rl.addView(selectedImageView, rlParams);
Bitmap myBitmap = BitmapFactory.decodeFile(path);
selectedImageView.setImageBitmap(myBitmap);
mediaHandler = dbHandler.getMediaInfo(path);
return false;
}
});
layout.addView(imageView);
The above is the portion in the case if the media is an image, the logic for video is basically the same.
Step 4.1 - Option Menu (res/menu/*.xml)
The option is pretty easy to implement, there are basically 2 steps. Firstly, set up the option menu in the respective xml in the folder "res/menu". Secondly, manipulate the option menu.
Below is a snippet of the xml file:
<menu xmlns:android="http://schemas.android.com/apk/res/android">
...
...
<item android:id="@+id/gallery_exit"
android:title="@string/menu_exit"
android:orderInCategory="100"
android:showAsAction="never" />
</menu>
Step 4.2 - Manipulate Option Menu (*.java)
Here we do whatever we want when user click on the specify menu button. In the activity class, there are 2 methods that we need to make changes to.
The following method is used to target the menu xml explained above:
@Override
public boolean onCreateOptionsMenu(Menu menu) {
getMenuInflater().inflate(R.menu.activity_video, menu);
return true;
}
The following method is where we manipulate the option menu:
@Override
public boolean onOptionsItemSelected(MenuItem item) {
switch (item.getItemId()) {
case R.id.gallery_display_map:
...
...
case R.id.gallery_exit:
Intent intent = new Intent(Intent.ACTION_MAIN);
intent.addCategory(Intent.CATEGORY_HOME);
intent.setFlags(Intent.FLAG_ACTIVITY_NEW_TASK);
startActivity(intent);
return true;
default:
return super.onOptionsItemSelected(item);
}
}
UPDATE CONCLUSION - CAMERA/VIDEO/GALLERY/MENU OPTION
This marks the end of this update, in the source code provided below probably still contains some bugs and requires further fine tuning. Note that not all the features in this update are fully implemented, for example, the target directory of the gallery is currently hard coded, the orientation of the camera and video appears to be wrong when saved and the application appears to be laggy at times and the application run into the outofmemory error. These errors are to be looked into in the next update. In the mean time, please feel free to send me suggestions/comments/questions regarding the update. The project and images of the current progress can be found below.
File: PotatoMemNap.zip
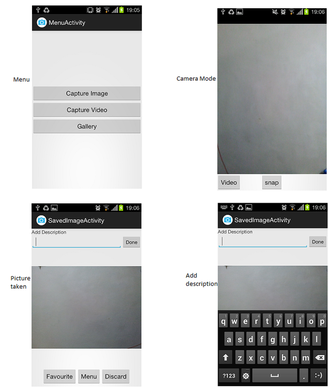
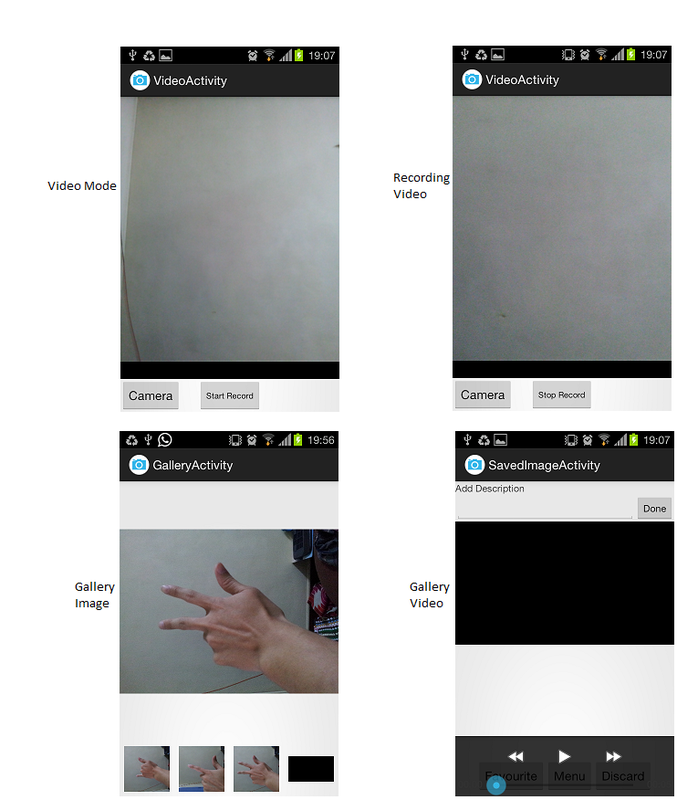
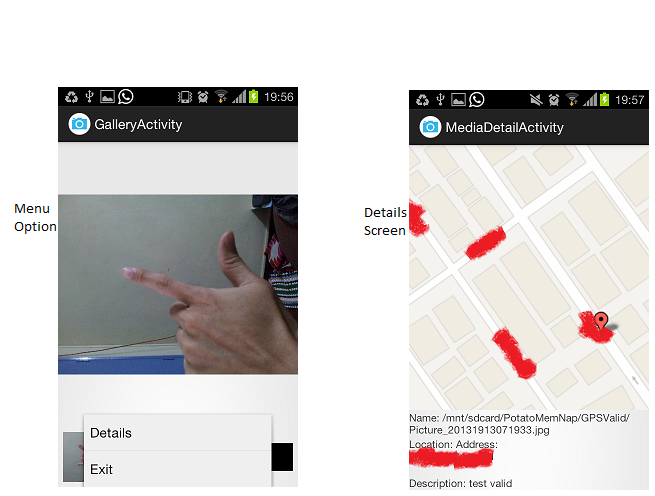
Lag fix/orientation fix/gallery
SUMMARY
This update is mainly solving the issues mentioned in the conclusion in the previous update.
Step 1.0 - Fixing the Lag and "outofmemory" Error
The lag and error is caused by the way images are handled in the all the activities that processes images. If you recall, in the previous update i talked about how Android recommends developers to handle images effectively by using the following methods:
public Bitmap decodeSampledBitmapFromUri(String path, int reqWidth,
int reqHeight) {
...
...
}
public int calculateInSampleSize(BitmapFactory.Options options,
int reqWidth, int reqHeight) {
...
...
}
Just use these methods when handling images and the problem is solved.
Step 2.0 - Fixing the Orientation of Images and Videos
In the previous update, the image and video taken and saved appears to be in landscape even though the preview was in portrait.
Step 2.1 - Fixing the Image Orientation
To fix the orientation of images, we have to rotate the Image View:
ImageView myImage = (ImageView) findViewById(R.id.imageView);
Bitmap bm = mediaHandler.decodeSampledBitmapFromUri(
mediaHandler.getFilePath(), 800, 600);
myImage.setRotation(rotate);
myImage.setImageBitmap(bm);
where rotate is the degree that you wish to rotate in Integer.
Step 2.2 - Fixing the Video Orientation
To fix the orientation of videos, we just have to add another line in the initMediaRecorder() method in VideoActivity.java:
private void initMediaRecorder() {
...
...
CamcorderProfile camcorderProfileQuality = CamcorderProfile
.get(CamcorderProfile.QUALITY_1080P);
mediaRecorder.setProfile(camcorderProfileQuality);
mediaRecorder.setOrientationHint(rotate);
mediaRecorder.setOutputFile(vidFile);
...
...
}
The line we are interested in is "mediaRecorder.setOrientationHint(rotate);" where rotate is the degree you wish to rotate in Integer.
Step 3.0 - Gallery
In the previous update, the targeted directory is hard coded. Currently, i used radio buttons to allow user to select which folder to view in the gallery.
Step 3.1 - activity_gallery.xml
Here, we just have to add the radio buttons to the xml:
<RadioButton
android:id="@+id/invalidMorningButton"
android:layout_width="wrap_content"
android:layout_height="wrap_content"
android:layout_alignParentLeft="true"
android:layout_alignParentTop="true"
android:text="Invalid-Morning"
android:textSize="8dp" />
Step 3.2 - GalleryActivity.java
Here, we add a listener for each of the radio button and pass the directory path associated with the selected radio button to the load() method:
// listener for invalidMorningButton button
invalidMorningButton.setOnClickListener(new View.OnClickListener() {
// actions to perform
public void onClick(View v) {
load(invalidMorningPath);
}
});
// listener for invalidAfternoonButton button
invalidAfternoonButton.setOnClickListener(new View.OnClickListener() {
// actions to perform
public void onClick(View v) {
load(invalidAfternoonPath);
}
});
and so on for each of the radio button. The parameter in load() will the targeted path which is a string.
CONCLUSION - LAG FIX/ORIENTATION FIX/GALLERY
This marks the end of this update, in the source code provided below probably still contains some bugs and requires further fine tuning. In the mean time, please feel free to send me suggestions/comments/questions regarding the update. The project can be found below.
File: PotatoMemNap_2.zip
RENAMING/ADD FAVORITE LOCATION name
SUMMARY
This will be a short update that focus on how to rename files and another add on to the previous feature that allows users to input a name should they decide to make it favorite location.
Step 1.0 - Renaming (Logic)
The general idea here is to include the a TextView, EditText and a Button in the layout but setting it to invisible initially until user press on the rename button. I will not go through this part as the process of adding a listener and obtaining the values from the an EditText have been touched on previously.
Step 1.1 - Renaming
The code is rather straight forward as show below:
File from = new File(curName);
File to = new File(newName);
from.renameTo(to);
mediaHandler.triggerMediaScanner(newName, getApplicationContext());
Step 2.0 - Add Favorite Location Name
Essentially, there is nothing new in terms of coding for this feature so there will not be illustrations of code here.
Generally the idea here is when a user snap a photo and the GPS coords are valid, users can choose to add the location as a favorite. Upon choosing, the user is required to enter a name for the favorite location. If upon taking a photo and the location is near a favorite location, a message is shown.
Hence, to do this, the process is almost the same as renaming a file. Include the TextView, EditText and "done" Button in the layout setting it to invisible initially until user press the "Add Favorite" button. Get the value when the user clicks done and update the database according.
UPDATE CONCLUSION - RENAMING/ADD FAVORITE LOCATION NAME
This is the end of this update, in the source code provided below probably still contains some bugs and requires further fine tuning. I am currently working on the Optical Character Recognition (OCR) functions and will be included in the next update. In the mean time, please feel free to send me suggestions/comments/questions regarding the update. The project and images of the current progress can be found below.
File:PotatoMemNap_3.zip
OCR/spinner/Search Gallery/search internet
SUMMARY
This update will focus on how to use a spinner (drop down list) and how to send a request to an internet browser. The OCR feature as a searching criteria appears not to work as good due to the accuracy and the time taken to scan an image. Nonetheless, i will still touch on how to use the feature for those interested.
Step 1.0 - OCR
1) Download the OCR engine from https://github.com/rmtheis/tess-two
2) After you download the project, import the project into eclipse
3) Import the project as a library for whichever OCR project you are working on
4) You can start using the API now
5) You may look at http://rmtheis.wordpress.com/2011/08/06/using-tesseract-tools-for-android-to-create-a-basic-ocr-app/ for more info
Step 1.1 - OCR code
First of all, we need to make sure the training data is in your project directory:
if (!(new File(DATA_PATH + "tessdata/" + "eng.traineddata")).exists()) {
try {
AssetManager assetManager = getAssets();
InputStream in = assetManager.open("tessdata/eng.traineddata");
OutputStream out = new FileOutputStream(DATA_PATH
+ "tessdata/eng.traineddata");
// Transfer bytes from in to out
byte[] buf = new byte[1024];
int len;
// while ((lenf = gin.read(buff)) > 0) {
while ((len = in.read(buf)) > 0) {
out.write(buf, 0, len);
}
in.close();
out.close();
} catch (IOException e) {
Log.e("Gallert act", "Was unable to copy " + "eng"
+ " traineddata " + e.toString());
}
}
Here is the where you call the OCR API:
TessBaseAPI baseApi = new TessBaseAPI();
baseApi.init(DATA_PATH, "eng");
baseApi.setPageSegMode(TessBaseAPI.PageSegMode.PSM_SPARSE_TEXT);
File curFile = new File(curMedia.getFilePath());
baseApi.setImage(curFile);
String recognizedText = baseApi.getUTF8Text();
baseApi.end();
Step 2.0 - Spinner
The Spinner is like the drop down box equivalent for Android. The implementation is rather simple.
Step 2.1 - Spinner (Implementation)
1) In res/values/strings.xml, this is where you define the drop down list:
<string-array name="path_arrays">
<item>GPSValid</item>
<item>Invalid-Morning</item>
<item>Invalid-Afternooon</item>
<item>Invalid-Night</item>
<item>Invalid-LateNight</item>
</string-array>
2) Listener for the spinner:
// Adapter for spinner
ArrayAdapter<?> adapter = ArrayAdapter.createFromResource(
getApplicationContext(), R.array.path_arrays,
android.R.layout.simple_spinner_dropdown_item);
// Sets the layout resource to create the drop down views
adapter.setDropDownViewResource(android.R.layout.simple_spinner_dropdown_item);
gallerySpinner.setAdapter(adapter);
gallerySpinner.setOnItemSelectedListener(new OnItemSelectedListener() {
public void onItemSelected(AdapterView<?> parentView,
View selectedItemView, int position, long id) {
// selected item from spinner
String item = parentView.getItemAtPosition(position).toString();
Toast.makeText(parentView.getContext(), item, Toast.LENGTH_LONG)
.show();
Log.d("gallery act", "spinner = " + item);
String targetPath = "";
if (item.equalsIgnoreCase("Invalid-Morning")) {
Log.d("gallery act", "loading morning = "
+ invalidMorningPath);
targetPath = invalidMorningPath;
}
... ... ...
} else if (item.equalsIgnoreCase("GPSValid")) {
targetPath = GPSValidPath;
}
Step 3.0 - Search Gallery
There is nothing special for this feature. Basically after user typed in the text to search for, obtain a list of media items from the DB, check each item's description and add each found item in a File array. After each search, if there is no result, offer user an option to search the internet, if there is a result, load the gallery with the searched results.
Step 4.0 - Search Internet
In 3.0, the logic is to perform an action according to the search results. If there is no results, use an AlertDialog to query user on whether to search the internet or not.
Step 4.1 - AlertDialog
AlertDialog.Builder alertDialogBuilder = new AlertDialog.Builder(
context);
// set title
alertDialogBuilder.setTitle("Search results");
// set dialog message
alertDialogBuilder
.setMessage(
"No results found, do you want to search the Internet?")
.setCancelable(false)
.setPositiveButton("Yes",
new DialogInterface.OnClickListener() {
public void onClick(
DialogInterface dialog,
int id) {
startActivity(new Intent(
Intent.ACTION_VIEW,
Uri.parse("http://www.google.com/search?q="
+ searchText)));
}
})
.setNegativeButton("No",
new DialogInterface.OnClickListener() {
public void onClick(
DialogInterface dialog,
int id) {
// if this button is
// clicked,just close the dialog
// box and do nothing
dialog.cancel();
}
});
// create alert dialog
AlertDialog alertDialog = alertDialogBuilder.create();
// show alertDialog
alertDialog.show();
Step 4.2 - Search the Internet
This is actually pretty easy to achieve:
startActivity(new Intent(
Intent.ACTION_VIEW,
Uri.parse("http://www.google.com/search?q="
+ searchText))
UPDATE CONCLUSION - OCR/SPINNER/SEARCH GALLERY/SEARCH INTERNET
This is the end of this update, in the source code provided below probably still contains some bugs and requires further fine tuning. With this update, the functional requirements are completed. In the mean time, please feel free to send me suggestions/comments/questions regarding the update. The project and images of the current progress can be found below.
| potatomemnap_4.zip |
